Player Takes Weapon Guide
- 4A Games
Subscript: j\player_take_weapon
Input Data
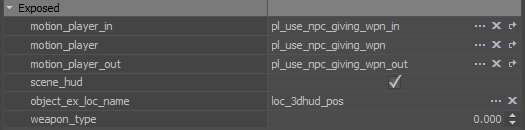
- motion_player_in – a short motion that puts the player in the right position for the interaction (12-30 frames).
- motion_player_main – the main motion of the interaction.
- motion_player_out – the motion that takes the player out of the scene and partially returns control. Starts as soon as the player stops interacting with the object/world.
- scene_hud – enables automatic scene HUD from the first frame. It is always necessary, if there is interaction between the player and the world, otherwise the player’s hand will miss the object. Automatic deactivation occurs once civil mode is deactivated.
- If more control over enabling/disabling is required, the scene HUD can be turned on by animation tags. The script will automatically turn the HUD on upon encountering the scene_hud_on tag and deactivate it on scene_hud_off.
- object_ex_loc_name – name of a locator in motion_ex_object, the point where the player will be pulled in during motion_player_in. If this locator does not exist or its name is incorrect, the player will be pulled into the model space point (posrot).
- weapon_type – ID of the weapon picked up by the player.
| ID | Weapon |
|---|---|
| 0 | Kalash |
| 1 | Ashot |
| 2 | Ubludok |
| 3 | Vyhlop |
| 4 | Ventil |
| 5 | Gatling |
| 6 | Uboynicheg |
| 7 | Revolver |
| 8 | Tihar |
| 9 | Helsing |
| 10 | Flamethrower |
| ... | |
| 25 | Map |
| 26 | Charger |
| ... | |
| 30 | Lighter |
| 50 | NO WEAPON |
Output Data

- motion_ex_object – the object to which the player will be pulled up and where object_ex_loc_name is expected to be.
- motion_main_start – out reporting that motion_player_in is over and the sync point of motion_player_main and the motion object the player is interacting with.
- finish – out reporting that the scene is over.
- weapon – the weapon the player is picking up.
How To Use
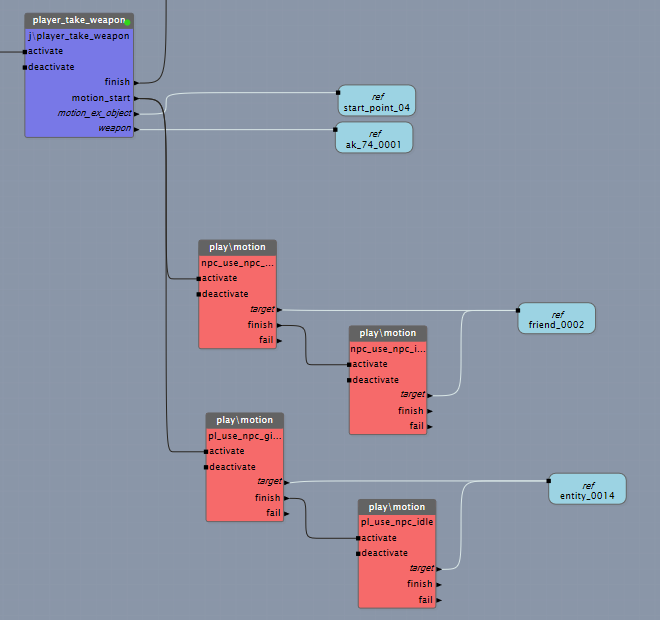
1) Attach the weapon the player is supposed to pick up to an NPC or a dummy’s locator.
2) Start the dummy/NPC animation along with the main player animation.
3) To match the position of the vambrace during the scene and immediately after it finishes, specify the correct weapon_type.
4) The player’s motions must include the pl_wpn_take and pl_wpn_finish tags.
In this example, the weapon and the box are attached to a dummy object. The NPC plays its motion in sync with the dummy.
Submitting a Scene for Animation
1) Add an effect, select the dynamic\objects\axis_xyz_helper model for it.
2) Place the effect where the player should be at the beginning of the interaction, thus creating the motion_ex_object. Name it start_point.
3) Add another instance of the same effect with the same model and place it at the point where the weapon is. Name it object_point.
4) Add another instance of the same effect and place it where the player should be at the end of the scene (If the player needs to move somewhere during the scene). Name it end_point.
5) Select these points, weapons, and geometry that the animator needs to consider, then Export to FBX.
Preparing a Scene in Maya
No matter where the geometry is, after importing into Maya, all the geometry needs to become a child of the axis_xyz_helper (player position) and must be placed in the player’s pos_rot initial position.
To simulate the player’s posture when looking down (approximately where the used object is expected to be seen), an auxiliary rig needs to be made.
- Create a cc_*look* controller.
- Group.
- Place the group in the camera position and make it a child of cc_spine2.
- Parent Constraint cc_*look* → grp_cc_spine3.
Animation for looking down is best placed in a separate layer.
Requirements for Motions
Weapon world → NPC → player
Example: a male NPC moves a box closer to himself, takes a weapon out of it and presents it to the player.
The weapon is somewhere in the world, then it is attached to a dummy’s locator, then, if need be, an NPC’s locator, then to the player’s locator.
The selected locators of the dummy, the NPC, and player (loc_ik_left_hand_body) match the position of the weapon exactly and are animated with it. The locators of the NPC and the player should be placed as high in the hierarchy as possible, preferably in the root bone (bip01, for example).
The player:
- in – (xform), tag scene_hud_off, accrue 400.
- main – (xform), pl_wpn_take – tag for the idle animation of hands in the player’s danger branch.
- out – ends at the same time as the weapon’s, accrue 100, pl_wpn_finish tag for switching the weapon to the player’s loc_wpn_base (matching loc_ik_left_hand_body and loc_wpn_base from the moment of the pl_wpn_finish tag).
Example 2: the NPC gives the player a weapon that is attached to the NPC
The weapon is attached to an NPC’s selected locator and is transferred to the player’s locator.
The selected locators in the NPC and player (loc_ik_left_hand_body) exactly match the weapon's position and are animated with it. The locators in the NPC and player should be located as high in the hierarchy as possible, preferably in the root bone (bip01, for example).
In addition
- Remove the animation (via Bone Filter) from all locators (except for loc_actor_camera and other tasks-relevant ones).
- Remove the animation (via Bone Filter) from the facial and driv bones.
- Set Quality to Ultra.
- Set Accrue, Falloff to 0, except for the specified motions.
Related content
Exodus SDK © 2005-2023, 4A Games Limited. Developed by 4A Games®.
4A Games® is a registered trademark, and 4A Games Limited, Exodus SDK and their respective logos are trademarks of 4A Games Limited.
Published by Deep Silver. Deep Silver is a division of PLAION GmbH, Austria. Deep Silver and Plaion are registered trademarks of PLAION GmbH.
Metro Exodus is inspired by the internationally best-selling novels METRO 2033 and METRO 2034 by Dmitry Glukhovsky.
All other trademarks, logos and copyrights are property of their respective owners. All rights reserved.
By using this site, downloading or using the Exodus SDK or related content, you are agreeing to be bound by the terms of the End User License Agreement.