Combat Tune
- 4A Games
Human
Static
Static Combat is one of the NPC behavior modes used upon detecting an enemy. In battle, an NPC remains (or tries to return) in its original position within the level.
This mode is convenient for creating shooters that hold a firing position (for example, snipers). Also, Static Combat is the only mode in which NPCs can fight monsters.
In order for an NPC to fight in Static Combat, the Static Combat checkbox must be checked in the NPC properties.
The section level where the NPC is located also requires an AI map.
It is impossible to combine Cover and Static Combat. That is, for example, an NPC in Static Combat cannot throw grenades using grenade covers.
Static Combat Settings
With the Static Combat checkbox turned on, the NPC will attack enemies while standing still and not using cover. Here are the relevant settings in the NPC properties:
- Hold Position – if an NPC moves relatively to the starting point, it tends to return to its original position.
- Anchor – a reference to a landmark at the level indicating where the NPC should return to after moving from its original position.
- Radius – the NPC returns to its original position, if it moves further away than the value specified in the Radius field, provided that there is no enemy in the radius of Enemy Dist.
- Enemy Dist – if there is no enemy in the specified radius, the NPC returns to its original position.
- Force WO Enemy – NPC id forced into the Static Combat state in the absence of enemy.
- Idle – a default idle animation in the combat state.
- Attack – a shooting animation in the combat state
- Reload – a reload animation in the combat state.
Cover
Cover Combat is one of the NPC behavior modes used upon detecting an enemy. In battle, an NPC moves through a combat cover system.
A cover of the human_combat type is an on-level object that determines the position and combat behavior of an NPC.
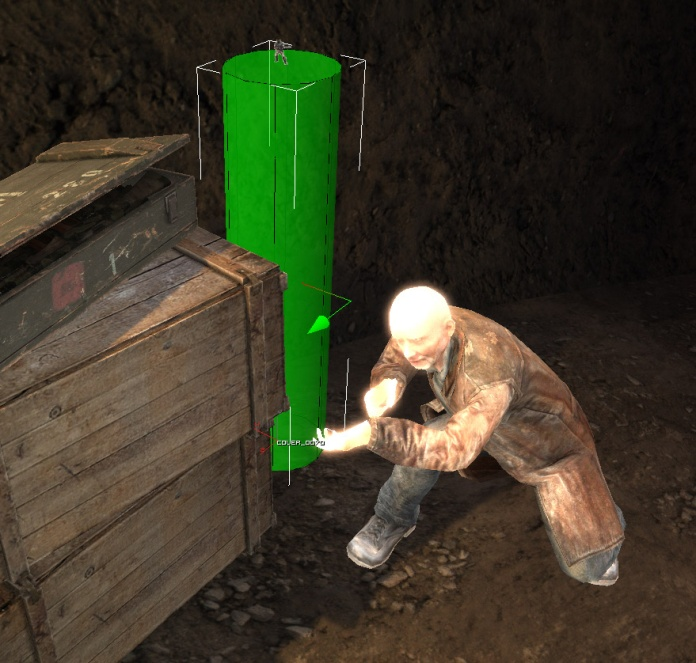
Figure 1. human_combat type cover.
In order for the NPC to use combat covers, the Cover Combat checkbox must be checked in the NPC's properties.
The color of the cover indicates its position on the AI map. Green means that the cover is on the AI map, red means that the cover is not on the AI map, or that the Must Be Not On AI Map checkbox is enabled in its properties.
A blue arrow at the center of the cover indicates the direction which the NPC faces while in cover.
Green arrows stemming from the center of the cover show which side of the cover the NPC can peek from.
Arrows stemming from the top of the cover show links to other covers. The icons above the arrows indicate the link types.
human_combat type cover properties
1. Cover
Type – the field where the type of cover is set (selected from the list of cover types).
2. Allowed Actions
In this section, flags indicate the position of an NPC in a cover, i.e. how the NPC will peek out of cover and fire.
- Stand – shoot while standing.
- Sit – shoot while sitting.
- Up – peek out of the cover and shoot crouched.
- Left Fire – peek and shoot from the left side of the cover.
- Right Fire – peek and shoot from the right side of the cover.
3. AI Map
Must Be On AI Map – when this option is enabled, the cover located outside an AI map will be colored red and an NPC will not use it or other such covers.
With the checkbox turned on, the cover will be automatically placed on the AI map.
Must Be Not On AI Map – the cover should not be on the AI map.
4. Radius
Radius – not used for human_combat covers (see grenade_cover and nosalis_cover for description).
5. Base
Transform
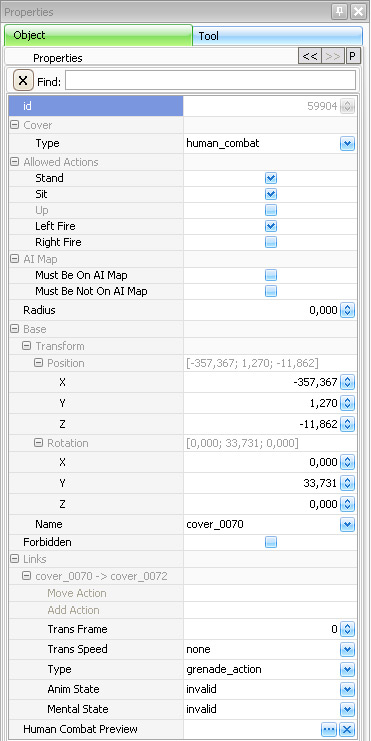
Figure 2. Properties of human_combat type cover.
Position – the position of a cover within the level.
Rotation – the rotation of a cover relative to the level coordinates. The rotation is possible only along the vertical axis.
Name – this field sets the name of the cover on the level.
Forbidden – when this option is enabled, NPCs are forbidden from using this cover.
6. Links
Displays links to other covers. In the field, under the “Links” heading, the names of the selected cover and the linked one are indicated.
Covers of the human_combat type should not have links to other covers (except for the grenade_target covers).
- Move Action – an animation that the NPC plays when using the link with another cover.
- Add Action – an animation additional to Move Action. Can also be used to attack an enemy, if the said enemy is within (Radius) of the cover.
- Trans Frame – for movement links (of the animation/ground_animation type), selects from which frame the blend will take place in the animation specified in the next link (if any).
- Trans Speed – the speed with which the blend will take place in the next linked animation (instant, fast, slow), if the animations match each other exactly. The first frame of the next is the last frame of the previous one. The blend speed should be fast, but if the animations are very different, the speed should be lower, increasing the blend time.
- Anim State – filters which animation (free/freegun/alert/danger, etc.) state this link can be used in.
- Mental State – filters which mental (e.g. light_alert, danger) state this link can be used in.
- Type – link type: different links are used by different NPCs with different behaviors.
"animation" – an animation cover used when an NPC moves along a path. The NPC moves from the beginning of the link to its end. Its movement is uninterruptible.
"ground_animation" – similar to the previous one, with the difference that the NPC is moving on the ground and can interrupt the movement (start moving in the opposite direction, stop, etc.).
"search_action" – used in alert behavior to build search paths.
"grenade_action" – used in cover-based combat to determine where grenades can be thrown from this cover.
"guard_action" – not used.
Human Combat Preview – choose and display an NPC's motion animations in a cover.
Setting Up Cover Combat
For an NPC to be able to carry out cover-based combat, the following actions are necessary:
- Create an AI map in the section of the level where the NPC is supposed to move.
- Enable the Cover Combat option in the NPC properties.
- Add cover of the human_combat type to the level.
When creating a combat cover system, it is desirable to have complete level geometry. In this case, it will be easier to set covers, since you will be better able to see all obstacles behind which the covers can be placed.
Also, when setting covers you should consider directions where the player may appear from. If, for example, all covers are facing north and the player comes from the south, all NPCs in the covers will end up facing away from the player (and will not be able to turn around).
Monsters
The task of setting up monsters for combat has its own quirks but is generally simpler.
For the standard type of monsters moving on the ground it is enough to create an AI map and add a monster to the game level. After that, it will start automatically attacking hostile faction members within the AI map.
Setting Up Monsters
Let’s examine the settings for an NPC of the Nosalis type.
As well as simply moving around the AI map, a Nosalis can use covers. Covers are individual for each monster type, the Nosalis uses covers located on the AI map and beyond it (the Nosalis can move not only on a horizontal surface but also in the vertical plane).
When using one type of Nosalis covers, different animations create a variation of movements in different planes. Thanks to this, the Nosalis is not tied to the AI map and can jump over gaps in it (for example, to clear various obstacles) using covers.
Basically, covers are used to make the movement of the Nosalis more spectacular (for example, via using the action “play cover path” in Visual Script), while in most cases the Nosalis attacks by approaching the player with the help of the AI map.
To make a Nosalis move around the AI map without using covers near the player, you should change the value of the Penalty setting in the monster’s properties “Covers” section.
Penalty – the distance at which the Nosalis is forbidden to use covers when building a path. For example, if Penalty = 50, then if the player is 55 meters away from the Nosalis, the Nosalis will approach the player using cover, if 49 – the monster will just run through the AI map without using the cover. Can be either a positive number (the priority of using cover is reduced) or negative (the NPC will prefer cover paths when moving).
To avoid the situation where two monsters use the same cover to build the path, the following settings can be set in their properties (the “Covers” section):
- Delay (Green) – delay before using a cover located on the AI map after another NPC leaves it.
- Delay (Red) – delay before using a cover located on the AI map after another NPC leaves it.
The delay does not guarantee a ban on the use of the cover but significantly reduces its likelihood. If there are no alternative travel paths, the NPCs will ignore the delay.
Creating a clone matrix
In the case of NPC monsters, it is often necessary to create an endless stream of running monsters (or a clearly defined number, for example, a pack of 10 Nosalises).
To do this, a control Visual Script is used to clone the source monster using specified conditions. In a monster-matrix of clones, the Visual Script is also created.
Control Visual Script
The Control script is a separate level object (of the visual script type).
In it, at the beginning of the game or upon receiving the death signal from the original monster, the nosalis_0001 monster is cloned.
Also, the VS contains “Counter” logic, tallying up the number of clones of the source object. The initial value of the counter is set to 10. This means that the cloning process will stop once 10 clones are killed.
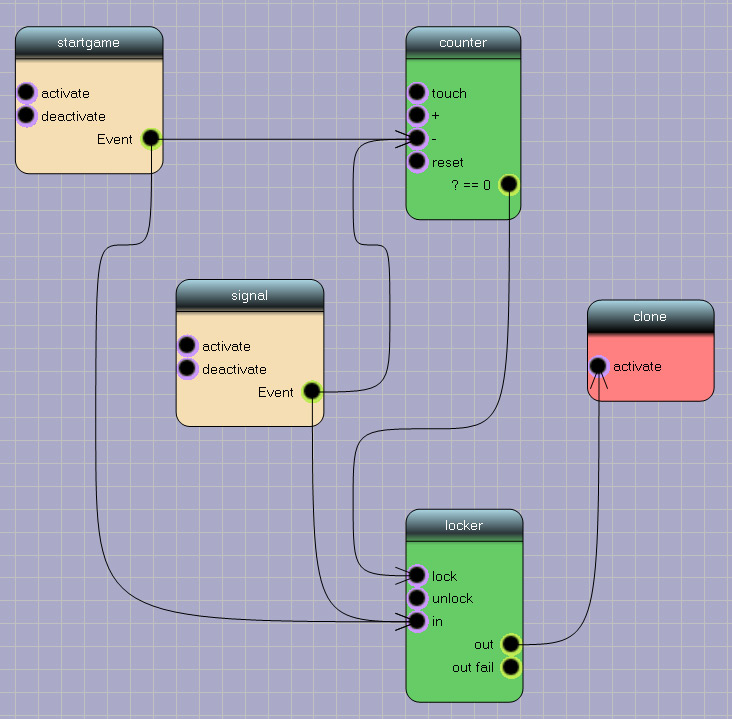
Figure 3. Control Visual Script.
Clone Matrix
In this VS, at the start of the game the original monster nosalis_0001 is deactivated (this is done so it does not put additional strain on the engine until the right moment in the game) and its clone is created.
After that, using the “after cloned” trigger (triggers → entity → after cloned) will activate the clone.
A copy of the original Nosalis appears.
The monster matrix must be located outside of the game level or somewhere where it can’t be seen and accessed by the player (to make sure that the monster matrix doesn’t get killed).
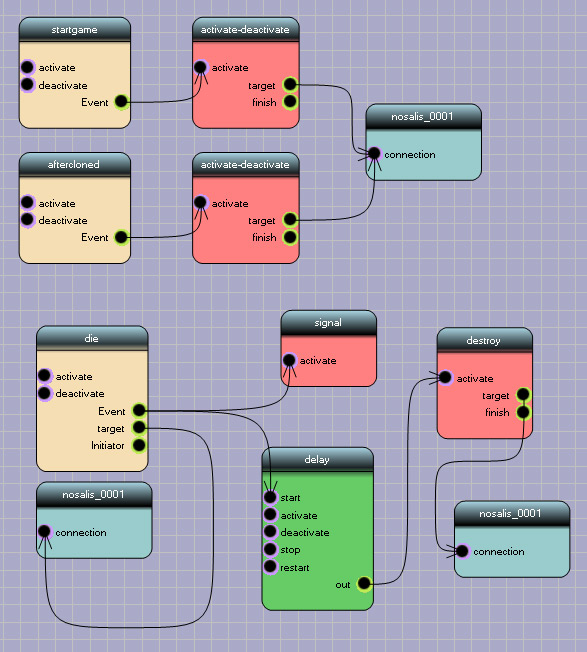
Figure 4. Visual Script in the clone matrix.
At the bottom of the VS, there’s a section that removes a dead monster from the game level. This is necessary so that NPC monsters do not accumulate on the level, as this puts undue strain on the engine.
For this, the trigger “die” and action “destroy” are used.
In this VS, the “die” trigger checks, if the nosalis_0001 monster is already dead and, after a delay, removes the object (monster) from the level, as well as sends the signal used in the control VS.
Related content
Exodus SDK © 2005-2023, 4A Games Limited. Developed by 4A Games®.
4A Games® is a registered trademark, and 4A Games Limited, Exodus SDK and their respective logos are trademarks of 4A Games Limited.
Published by Deep Silver. Deep Silver is a division of PLAION GmbH, Austria. Deep Silver and Plaion are registered trademarks of PLAION GmbH.
Metro Exodus is inspired by the internationally best-selling novels METRO 2033 and METRO 2034 by Dmitry Glukhovsky.
All other trademarks, logos and copyrights are property of their respective owners. All rights reserved.
By using this site, downloading or using the Exodus SDK or related content, you are agreeing to be bound by the terms of the End User License Agreement.