Model
- 4A Games
- 4A Games (Unlicensed)
Interface
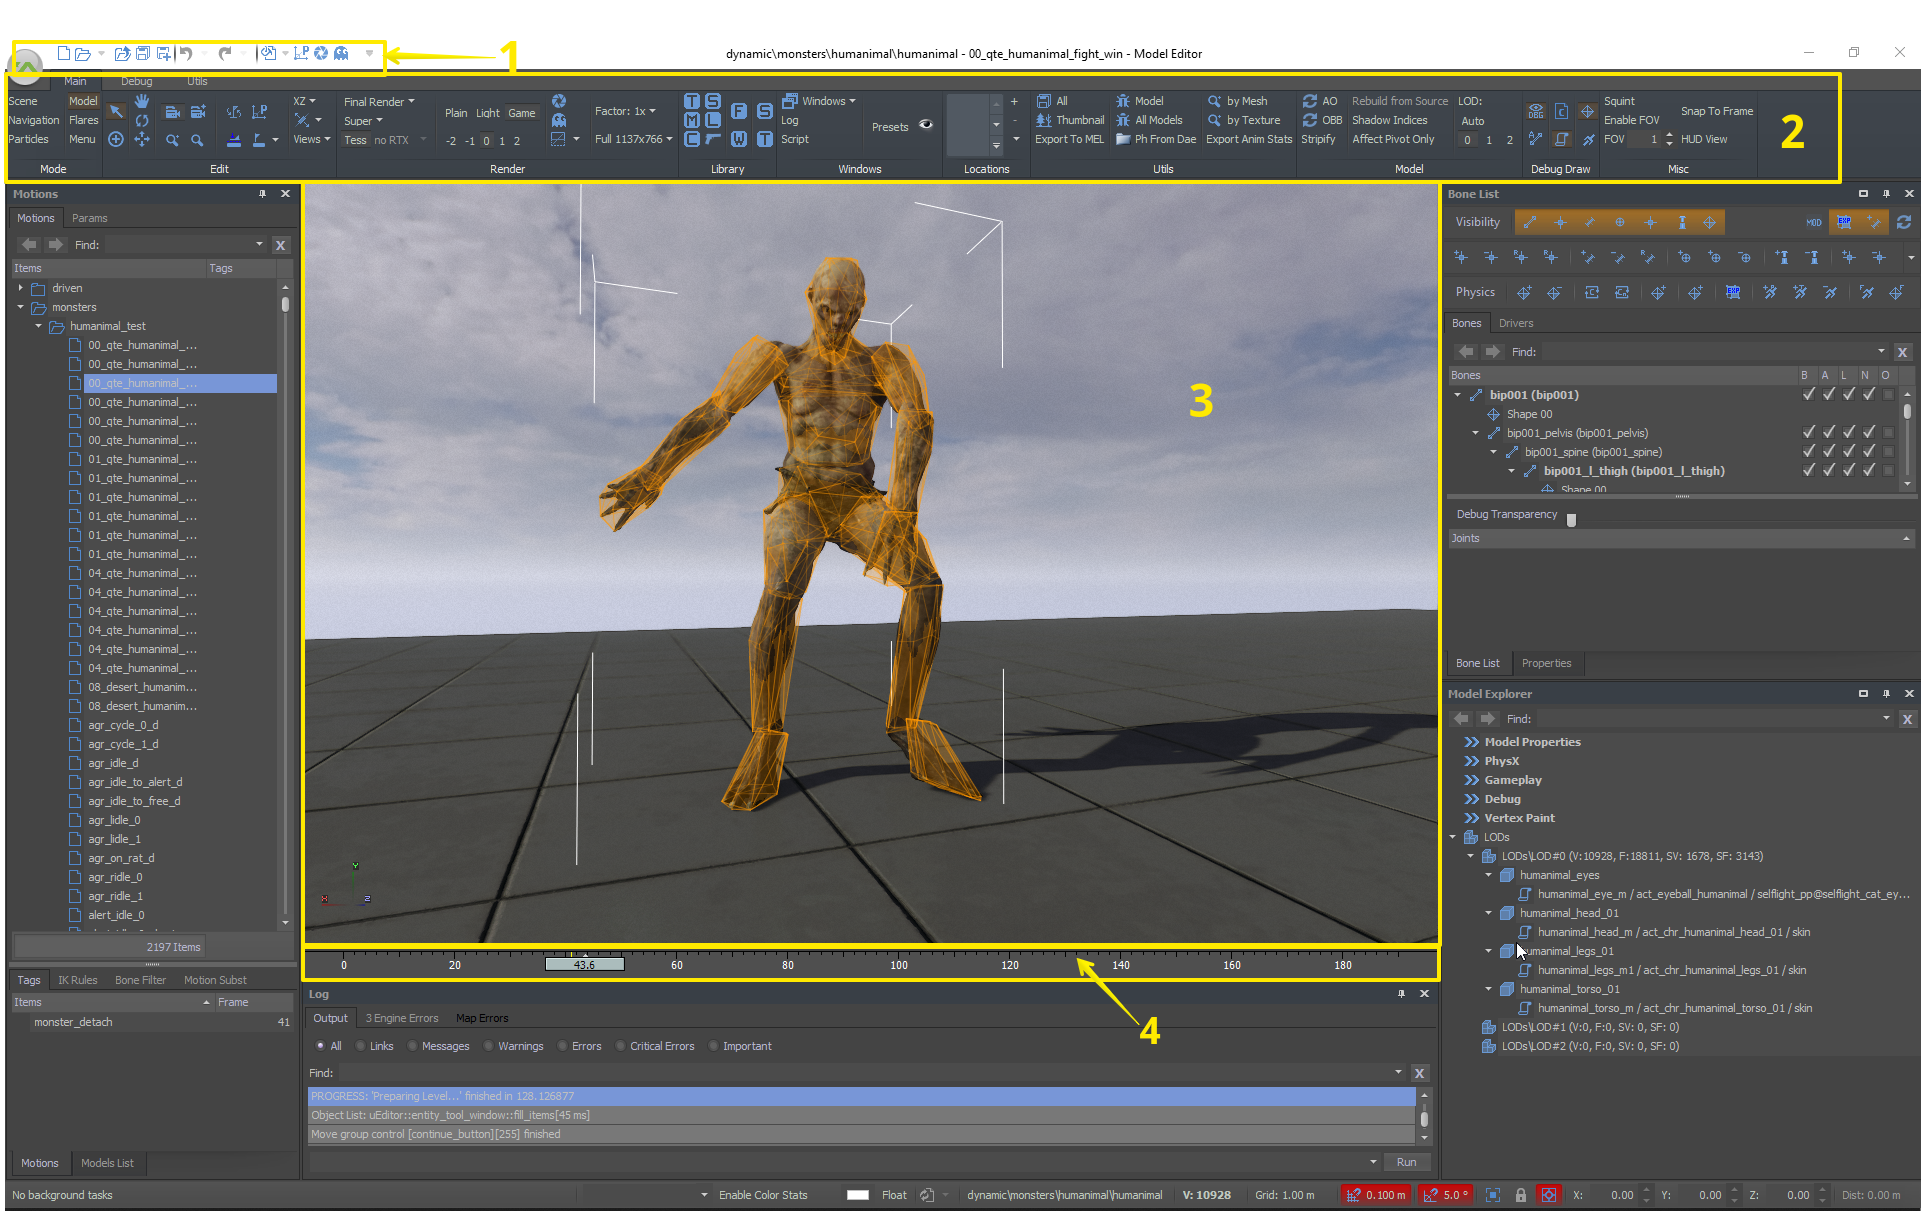
- Toolbar
- Viewport
- Timeslider.
Overview
The model editor allows you to change collision properties, textures, materials, add locators and texture presets, edit animation tags and other animation properties using the Model Tool.
While in this mode, you're "locked" to the selected model. All changes made to the model will affect all instances of that model, across all levels.
Quick Access Toolbar for the Model mode.
| Icon | Description |
|---|---|
| New. Creates a new model. |
 | Open. Opens the necessary model from the list or chooses from the recent. |
| Reload. Reloads the current model. |
 | Save All. Calculates the covers and saves changes. Shortcut: Ctrl + Alt + S. |
| Save As... Saves your model in the new folder. |
| Reveal In Explorer. Opens an Explorer window to let you quickly access the model. |
| Undo. Cancel the last operation/s. |
 | Redo. Redo the last operation/s. |
| Skin. Choose a skin. |
| Exit. Exits the SDK. |
 | A drop-down menu with all the aforementioned options. |


Toolbar

Edit
| Icon | Description | Shortcut |
|---|---|---|
 | Select. Upon moving the cursor over the model, it will be Highlighted by markers (bounding box). To select the Phys shell, click it with LMB. That makes it Selected. | S |
 | Move. When the model is selected and the Move mode is activated, the coordinate axis pivot is displayed. Drag the axis with your LMB in order to perform the action relative to this axis. | T or W |
 | Rotate. When the model is selected and the Rotate mode is activated, the coordinate axis pivot is displayed. Drag the axis with your LMB in order to perform the action relative to this axis. | Y or E |
 | Scale. When the Phys shell is selected and the Scale mode is activated, the coordinate axis pivot is displayed. Drag the axis with your LMB in order to perform the action relative to this axis. | H or R |
 | Game camera style. | Hold SHIFT or MMB + WASD + mouse movement |
 | Arcball camera style. | Hold ALT+MMB |
 | Zoom. Zooms the camera to overlook the model. | |
 | Zoom Selected. Zooms the camera to the selected model. | Home |
 | Pivot Mode. Increases/decreases the size of the pivot. | |
 | Edge align. When the option is on, bounding to the polygon edges is performed. | Hold F + LMB |
 | Normal align. Aligns model on the X, Y, or Z axis. | Hold F + LMB |
 | Select Axis. Select which active Axis to apply when Moving, Rotating, or Scaling an object (while not dragging the pivot directly). | (numbers 4, 5, 6, 7, 8, 9, 0) |
 | CS Type. Select which Coordinate System to apply when Moving, Rotating, or Scaling a model - World, Local, or Screen. | (numbers 1, 2, 3) |
 | List of Views. Select which Viewport Preset (in relation to the Selected Model) to activate. |
View and Render
| Icon\Option | Description | Shortcut |
|---|---|---|
 | Render mode. Allows you to analyze different channels of the render. Note that you should press every number key multiple times while you're still holding Shift to cycle through different variations of each Render mode.
Check your PBR material – Shift+1,1. Generally, if you see Red, your albedo is wrong. If you see Green, you have incorrect reflectivity (F0). If you see Blue, you have incorrect gloss. If you see another color, there are multiple issues and these materials will need to be resolved. Small colored areas are not bad. Colors are ordered by importance, R-G-B: Red = critical issue, Green = moderate issue, Blue = small issue.
|
|
 | Quality Level. Change the quality of the scene
| |
 | Enable/Disable Tesselation. | |
 | *unavailable* | |
 | Change the exposure type of the scene. Should be kept in "Game" for most cases. | |
 | ||
 | ||
 | Exposure Levels. (0 = neutral exposure, -2 = darkest, 2 = brightest). | |
 | Will ignore portals occlusion. See SuperStatic to learn more. | |
 | Will ignore meshes setup as a ghost. | |
 | Shapes Wire Mode (Regular / On top / Solid). | |
 | Factor. Use 2x for a clearer picture (especially if you're an artist). Use 1/2x for better performance. | |
 | Resolution. Changes the Resolution / Aspect Ratio. |
Library
This is where you can access specific auxiliary smaller-scale in-house editors, which can be integrated into Exodus SDK.
- Texture Editor
- Sound Editor
- Foliage Manager
- Material Editor
- Localization Manager
- Weather Editor
- Color Animator
- Weapon
- Super Static Tool
- Track Editor
Windows
| Windows | Opens a context dialog with a list of all model editor windows. |
| Log (<number>) | Message Log window access; the number in brackets shows the current number of important errors found; Log is also the place where you input console commands. This is common sense, but not all errors are to be attended by every developer personally; some should be attended by you, especially if you know how to fix them right away, whereas others should be reported to the appropriate departments. Keep that in mind when interacting with the Log. |
| Script | Opens the AS Editor. |
| Presets | Opens the Texture Preset. |
| Preview | If enabled, a preview of a model will draw with the selected texture preset in the Texture Preset. If disabled, the preview of the model will draw without the selected texture preset in the Texture Preset. |
Locations
| Icon\Option | Description |
|---|---|
 | To add a location bookmark. |
 | To remove the currently selected location bookmark. |
 | To access additional navigation options. |
| Lets you specify the location manually, with camera Position & Rotation coordinates. |
| Moves you to the current player location. |
| Lets you specify the screenshot, which contains the coordinates in its original filename, and move to that location. |
A more effective way to use screenshots as location bookmarks would be the following:
1) Navigate to the camera location you want to save in the screenshot and hit F12. The screenshot of the location will be created in your folder \temp\screenshots.
2) Drag and drop the screenshot - provided it still has its original complicated name - directly into the Viewport. Exodus SDK will navigate to that location.
Sharing and/or uploading screenshots, which were created in the editor with the F12 key, is a convenient way to communicate camera positions between team members, be it programmers investigating a bug or artists decorating your carefully crafted gameplay sandbox.
Utils
| Option | Description |
|---|---|
| All | Save All. |
| Thumbnail | Create a thumbnail for the mesh. |
| Export To MEL | Export a skeleton to a *.MEL file. |
| Model | Check Model. |
| All Models | All Models for errors. (ALL MODELS WILL TAKE A LONG TIME AND MAY CRASH). |
| Ph From Dae | Ph from Dae allows to import physics shells from a *.DAE file. |
| by Mesh | Allows you to search in the library for models by Mesh. |
| by Texture | Allows you to search in the library for models by Texture. |
Model
| Option | Description |
|---|---|
| AO | Recalculate AO (Ambient Occlusion) for the model. |
| OBB | Recalculate OBB (Oriented Bounding Box) for the model. |
| Stripify | Stripify Check for Material errors (e.g. non-approved materials). |
| Rebuild from Source | RfS Re-import mesh. |
| Shadow Indices | Shadow Indices: Rebuild Shadow Indices for model. |
| Affect Pivot Only | Affect Pivot Only: Allows you to move the pivot only (good for pivot correction). |
LOD:
| Allows you to manually see LODs for the mesh. Auto will automatically change. |
| 0 = Original Mesh / 1 = First LOD / 2 = Second LOD. |
Debug Draw
| Icon | Description |
|---|---|
 | Draw Debug. Draw Debug mode (for options below). |
 | Show All Bones. Draw/show all the bones in the model. (Entities only.) |
 | Draw Bones. Draw/show all the bones in the model. (Entities only.) |
 | Preview Part Selection. Allows you to view a preview selection of the mesh when selecting materials in the Model Explorer Window. |
 | Draw Phys Shells. Show Physics shells/links for the model. (Entities only.) |
 | Draw Phys Links. Show Physics shells/links for the model. (Entities only.) |
Misc
| Icon\Option | Description |
|---|---|
| Squint | Apply a specific debug-only Blur effect to the viewport; its purpose is to help assess the "readability" of the level design and/or color-coding. |
| Enable FOV | Apply the specified FOV multiplier to the viewport; its purpose is to help compose the scene designed for a special FOV, e.g. a special cutscene or scripted gameplay effect. |
FOV | Refers to the button "Enable Fov". First, enable it, then you can change the value between 0 and 2. (1 and more will increase the Field of View. 0 or less will decrease the Field of View.) |
 | Below the viewport, there is a timeline for the preview motions. With this option enabled, you can set the integer values. |
 | Puts the camera relative to the preview of the model as if it were standing on the player. |
Time slider
Allows you to slide the motion time.
RMB Utils
| Option | Description |
|---|---|
| Append Tag | Adds a new tag for the selected frame. |
| step_left | Left foot step. |
| step_right | Right foot step. |
| step_right_hand | Right hand step. |
| step_left_hand | Left hand step. |
If you disable "Snap to Frame" on the Misc, you can set fractional values.
Exodus SDK © 2005-2023, 4A Games Limited. Developed by 4A Games®.
4A Games® is a registered trademark, and 4A Games Limited, Exodus SDK and their respective logos are trademarks of 4A Games Limited.
Published by Deep Silver. Deep Silver is a division of PLAION GmbH, Austria. Deep Silver and Plaion are registered trademarks of PLAION GmbH.
Metro Exodus is inspired by the internationally best-selling novels METRO 2033 and METRO 2034 by Dmitry Glukhovsky.
All other trademarks, logos and copyrights are property of their respective owners. All rights reserved.
By using this site, downloading or using the Exodus SDK or related content, you are agreeing to be bound by the terms of the End User License Agreement.